 José is a tool to create object reports on Active Directory (AD). It reads object data and logical data from AD and writes it to an HTML file that you can use for analysis and documentation. The reports are configurable in their scope and can be automated via a command line interface.
The tool is based on HTML and scripting which means you can easily adjust it to your needs. It is free and may bee freely distributed.
This page features the English version of José which has been translated from German. Please note that parts of the translation are machine-generated. A fully multilingual version is on our roadmap, but we cannot provide a release date for that.
Find the original German version at: http://www.faq-o-matic.net/jose/
Version and Download
The current English version is: 3.14 EN
Download the current version here:
 José AD Reporting, English version (89,9 KiB, 12.918-mal heruntergeladen, letzte Änderung am 27. April 2026)
Quick Start
- Download José
- Un-zip it to any folder
- To create pre-defined reports just run the batch file Default-Reports.bat (this is recommended for a quick overview of the AD environment)
- To define a custom report launch jose.hta by double-clicking the file, then select your options and click report now
- The reports are stored in the subfolder Reports
Overview
José is a script-based tool written in Visual Basic Script (VBS). Its source code is freely editable – please respect the copyright and mention the original authors if you change the code.
José reads data about the AD domain that the logged-on user belongs to. It then writes that data to the report file. The script does not change anything in the domain and thus is “safe”. It may however cause remarkable system and network load in very large environments while it reads data from the domain.

José’s configuration window for the interactive mode
The main executable files are listed below:
- Jose.hta: double-clicking this file will launch the “interactive mode” of the program. A configuration window opens, allowing you to select the data to include. Clicking “Report now” will create the report.
- JoseExec.vbs: This is the command-line interface for José. Please do not run this file with a double-click but only launch it from a CMD window prepending “cscript” to the command line. Example:cscript JoseExec.vbs /d:<definition> [/r:<report>] [/t:<title>] [/f:<filter>]Please refer to the details below for further information.
- Default-Reports.bat: This batch script will automatically generate a set of predefined reports on the current domain:
- General technical information on the domain
- Overview of Group Policy Objects
- Overview of Exchange objects
- Overview of users, groups, and computers
José does not require any installation or setup. Please un-zip the archive file to a location of your own choice. The created reports will be stored in the subfolder “Reports” (which will be created if it does not exist) and can be opened by double-clicking. If you want to copy the reports to a different location please use the “Save page” command of your browser. Alternatively you can copy the complete José folder. This makes sure that all files are found when a report is displayed.
José can report on some data that most other tools do not know. This includes:
- Password Setting Objects
- Security ID (Object SID and SID History)
- Password Policies
- Tombstone and AD Recycle Bin settings
- Last AD backup date
- Permitted logon hours for a user
- AD schema version, Exchange schema version
José can easily be extended with additional attributes that it does not read by default. For most text-based attributes it is sufficient to add a simple entry in a “definition file” that defines a report (or, just add the attribute name in one of the “other” input fields in the HTA GUI).
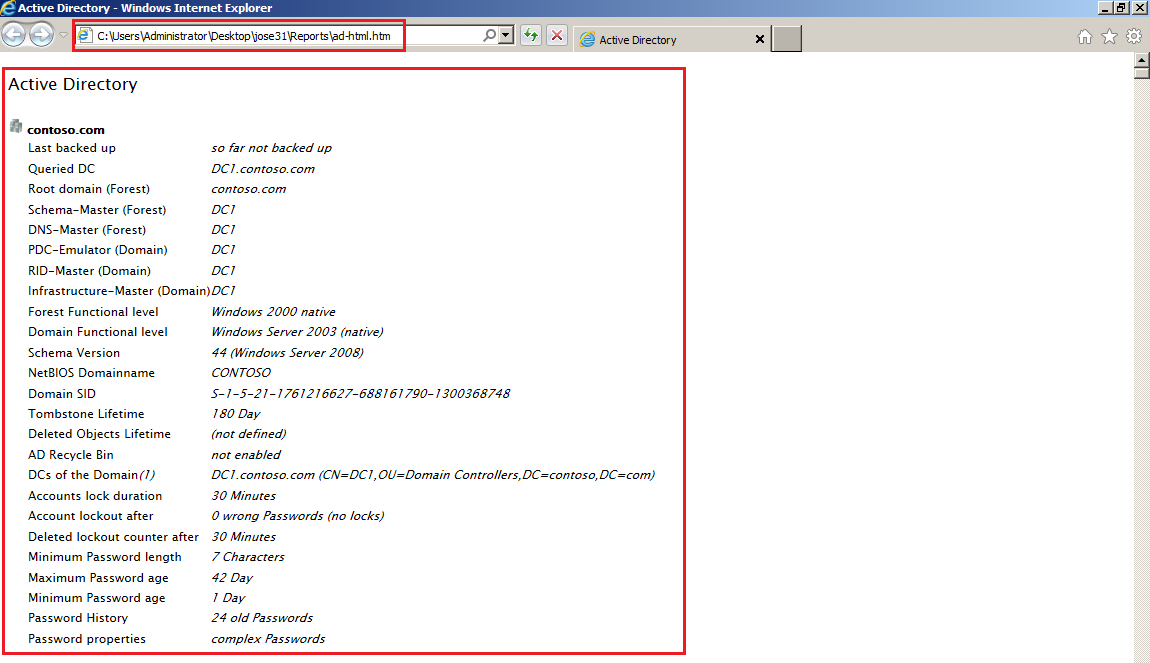
Extract from a sample report
Details
José’s reporting engine connects to the local AD domain and reads data object by object. You can specify which details and attributes you want the report to include, and the script will write that to an HTML file. Caution: José’s engine has not been optimized for very large envrionments so there may be remarkable network load or considerable execution time. However, we have been using José even in environments with thousands of objects, and it did not cause any issues. If you need to create reports on very large domains it may be a good idea to use the OU filter feature and create multiple reports for parts of the environment.
José was written by Nils Kaczenski, Ansgar Wiechers and Nils Weinhold. Its translation was initiated by Patris_70.

Another extract from a sample report
Usage modes
José has two modes of operation:
- Interactive mode, GUI driven
- Scripted mode using the command-line interface
Interactive Mode: Jose.hta
Launch José by double-clicking jose.hta. A form opens that allows you to configure the report. Several sections cover a number of object classes, such as users, groups etc. This works as follows: The first bold line of each section controls whether the respective class appears in the report. If a class is de-selected, all its attributes will be automatically ignored (you do not need to uncheck those in that case).
José displays the attribute LDAP name if you hover the mouse pointer over the respective check box. Upon launch of the GUI, a number of default classes and attributes is preselected. If you want to reset your configuration to this default simply click the button “Default selection” (the other selection buttons speak for themselves).
The last attribute option for each class is “other”. This allows you to add attribute names that are not yet listed in the GUI. You may add multiple attribute names and separate them by comma, but do not add spaces/blanks. If you want these attributes to be included in your report remember to check the box “other” as well.
If you uncheck “OU structure and Objects” in the top left corner, José will not walk through the directory tree. This may be useful for reports on core domain or GPO data.
Filtering
You can tell José to only report on a sub-tree of your domain. To do so, click the button “Show OUs” on the right. José will then list the OU tree in the form window, allowing you to select one OU. This OU’s LDAP name will then be displayed in the line “Start report at OU” on top of the window. If anything is listed there, José will only report starting at this container. The report will contain a note on this filter.
Caution: This is the only way to filter the report data. José has no way to set query filters. If you need to report on “all objects with certain properties” you should use a different tool.
Miscellaneous
Selecting group membership attributes may lead to longer execution times in larger domains.
Reporting on Group Policy Objects covers only the objects themselves and their metadata but not their actual settings. GPO settings cannot be read by simple scripts. We recommend using Group Policy Management Console for this, especially the VBS script GetReportsForAllGPOs.wsf or its more modern PowerShell counterpart Get-GPOReport.
José can read teminal server settings (for servers newer than Windows 2000) in two ways, but data will only be displayed in the “traditional” attributes. This is because the new attributes introduced with Windows Server 2008 are still unused by Microsoft …
Execute reports
The field “Report Name” allows you to specify a freindly name for your report. Combined with “Explain Symbols”, “Display object name” and “Properties in friendly language” this will create reports that are suitable for non-tech audiences.
“Report File Name” specifies a file name for the report to create. If you leave this blank, José will create a file name. But caution: If a file already exists it will be overwritten.
Clicking the button “Report now” will start the reporting process. A black CMD window opens that you need to leave alone. It may look as if nothing happens for several minutes, but this is normal operation (JoséExec.vbs is working in the background). As soon as the report is done a link to the report file will be displayed in the GUI status area on the bottom of the window.
Optionally, you can save your report definition if you want to do the same report again later. To do so, click “Save report definition” and specify a file name (just the file name, no path). José stores all definition files in the subfolder \Definitions.
Automatic Mode: JoseExec.vbs
You can run José automatically to create reports. This is done with the engine file JoseExec.vbs which reads the report definition from a text file. Launch the script from a CMD window and remember to put “cscript” first. The command line syntax is:
cscript JoseExec /d:<definition> [/r:<report>] [/t:<title>] [/f:<filter>]
- /d: Name of a José report definition filespecify only the file name, no path
- /r: (optional) Name of the report file to create (HTML)specify only the file name, no path. Caution: Existing files will be overwritten!
- /t: (optional) Report title
- /f: (optional) LDAP object filter (Container/OU)
- /debug: (optional) Debug data in the CMD window
The parameter “/d” is mandatory.
You should enclose all parameters in quotation marks. Here’s an example:
cscript JoseExec /d:"DomainData.txt" /r:"MyDomainData.htm" /t:"My Domain" /f:"OU=IT,OU=MyUsers,DC=domain,DC=tld"
To create a debug log file add the /debug parameter and redirect the output to a file. Example:
cscript JoseExec /d:"DomainData.txt" /r:"MyDomainData.htm" /debug > C:\Data\josedebug.txt
Definition file format
The definition file for a type of report uses quite simple a format. Here’s an example:
; --------------------------------------------
; José-Definitionsdatei AD-Definition-Beispiel.txt
; Erzeugt: 10.03.2010 06:44:20
; von: FAQ-O-MATIC\Nils
; mit: José AD-Dokumentation 3.0
; Download auf http://www.faq-o-matic.net
; --------------------------------------------
[Meta]
ReportName=Active Directory
ReportFileName=AD-Doku 15.09.2008 16-27-08.htm
ObjectFilter=
ShowSymbols
ShowNaturalName
ShowFriendlyName
[Common]
fsmo
trust
folder
OU
gpo
number
Modify
[Printer]
serverName
printShareName
[Group]
[Contact]
[User]
samAccountName
userPrincipalName
profilePath
homeDirectory
homeDrive
scriptPath
A semicolon (;) at the first position turns the line into a comment. Such lines are ignored. Comments must be in separate lines, they cannot be appended to a code line.
Each section starts with a label in square brackets. Currently, José understands the following labels: [Meta], [Common], [Printer], [Group], [Contact] and [User]. They denominate the object classes – except for Meta and Common which declare some basic properties of the report.
The [Meta] section contains the report options. The report name, file name and OU filter defined in the file may be overridden by the command line parameters /r, /t, and /f. If specified on the command line, José will ignore the values in the file.
The [Common] section lists the options you find in the top left corner of the GUI.
All other sections are quite simple: If one section exists, the correspondig object class will appear in the report, at least with its object name. Below the section label there are the attributes to include for that object class.
Extending reports
José’s architecture allows for easy extension of reports. You can add attributes by simply putting their names (e.g. employeeID) into the definition file using a text editor. Vice versa, you can remove attributes from an existing definition by deleting their names from the file. This technique works well for simple text attributes.
José includes additional logic for some attributes that are complex to evaluate. You can only add those attributes using the definition file (or, the “other” input fields in the GUI). Those are:
- logonHours (permitted logon hours)
- pwdLastSet (last password change date)
- lastLogonTimestamp (last replicated logon date)
- canonicalName (OU path in a “file path” format)
Here’s an example of an extended file:
; --------------------------------------------
; José-Definitionsdatei AD-Definition-Beispiel.txt
; Erzeugt: 10.03.2010 06:44:20
; von: FAQ-O-MATIC\Nils
; mit: José AD-Dokumentation 3.0
; Download auf http://www.faq-o-matic.net
; --------------------------------------------
[Meta]
ReportName=Active Directory
ReportFileName=AD-Report-Example.htm
ObjectFilter=
ShowSymbols
ShowNaturalName
ShowFriendlyName
[Common]
fsmo
trust
folder
OU
gpo
number
Modify
description
[User]
samAccountName
userPrincipalName
; start: manual extension
distinguishedName
logonHours
pwdLastSet
lastLogonTimestamp
employeeID
The file parser is quite robust. It skips blank lines, it ignores unknown attributes, and it does not care for the order of sections.
José License
You may download and use José free of charge. You may use and distribute the reports you created with José freely.
You may change the source code of the script for all files contained in the download archive. Please leave a note of the original name, the original authors and the original download source in your altered copy of the code. Please use your own version numbers or labels if you have created an altered version.
You may distribute José or your own altered version of the tool. You may not charge money for José unless you have significantly extended the code.
You may use portions or parts of the code for your own scripts or other purposes and use the resulting code as you like. Please leave a note of the code origin in your version, at least as a hint in the code.
The authors of José do not take any responsibility for its function or absence of errors. Using José is fully at your own risk. There is no support by the authors. The authors will not provide corrections or changes to the code.
http://faq-o-matic.net/?p=5240